华为云主机
Tags: ECS, Linux, Ubuntu Date: March 22, 2024 Status: Not started
- [x] 配置用户
- [x] 配置ssh
- [x] 配置zsh
- [x] 配置docker
- [x] 配置外网出口
- [ ] ssh(端口转发、穿透)
- [ ] frp 转发穿透
- [ ] ci/cd流水线
地址
用户
## 修改密码
passwd
## 新增用户组
groupadd -g 344 gxhao
## 新增其他用户
useradd -d /home/gxhao -g gxhao -m gxhao
## 修改主目录
sudo usermod -d /home/gxhao gxhao
## 添加sudo权限
### 1、以 root 身份登录系统。
### 2、执行以下命令打开 sudoers 文件:
sudo visudo
### 3、在文件中找到 root ALL=(ALL:ALL) ALL 这一行,添加以下内容:
gxhao ALL=(ALL:ALL) ALL
### 保存文件并退出。
shell
## 安装zsh
sudo apt install zsh
## 安装oh my zsh
sudo sh -c "$(curl -fsSL https://gitlab.aiursoft.cn/gxhao/ohmyzsh/-/raw/master/tools/install.sh)"
## 安装自动输入插件
### 1、Clone this repository into $ZSH_CUSTOM/plugins (by default ~/.oh-my-zsh/custom/plugins)
git clone ssh://git@gitlab.aiursoft.cn:2202/gxhao/zsh-autosuggestions.git ${ZSH_CUSTOM:-~/.oh-my-zsh/custom}/plugins/zsh-autosuggestions

### 2、Add the plugin to the list of plugins for Oh My Zsh to load (inside ~/.zshrc):
plugins=(
    # other plugins...
    zsh-autosuggestions
)
### 3、Start a new terminal session.
ssh
## 生成ssh key
git config --global user.name 'gxhao'
git config --global user.email '1625546088@qq.com'
# 生成密钥(注意设置git账号密码
ssh-keygen -t rsa -C '1625546088@qq.com'
# 检测是否配置成功
 ssh -T git@github.com

# 配置免密码登录
## 新增远程服务器文件
.ssh/authorized_keys
## 直接命令执行
ssh-copy-id gxhao@116.205.246.217
## 查看登录日志
sudo cat /var/log/auth.log | grep sshd

# (Authentication refused: bad ownership or modes for file /home/gxhao/.ssh/authorized_keys)

##登录配置
###SSH 登陆服务器需要知道服务器的主机地址(主机名或主机 IP 地址),用户名和密码,有时还要指定端口号(默认 22 )。主机名还好,但是主机IP 地址就比较难记的,特别是当你可能要登录十几台服务器时。一般我们使用的登陆命令如下:

# 登陆目标服务器( 172.17.132.120 )
ssh -p 58422 user@172.17.132.120
# 通过跳板机登陆目标服务器( 172.17.132.120 )
ssh -p 58422 user@jumper.example.com ssh user@172.17.132.120
# 端口映射
ssh -p 58422 user@jumper.example.com -fNL 5433:172.17.132.120:5432 -N
注:如果配置authorized_keys仍无法免密码登录,需要检查权限及所有组
SSH Authentication Refused: Bad Ownership or Modes for Directory
配置clash for linux
防火墙
查看想开的端口是否已开:sudo firewall-cmd --query-port=6379/tcp
添加指定需要开放的端口:sudo firewall-cmd --add-port=123/tcp --permanent
重载入添加的端口:sudo firewall-cmd --reload
查询指定端口是否开启成功:sudo firewall-cmd --query-port=123/tcp
移除指定端口:sudo firewall-cmd --permanent --remove-port=123/tcp
查看已开端口:sudo firewall-cmd --list-ports

端口转发:yum install -y nc
nc --sh-exec "nc 192.168.0.204 8080" -l 18080  --keep-open &
安装docker
## 安装常用软件
sudo apt-get install \
    apt-transport-https \
    ca-certificates \
    curl \
    gnupg \
    lsb-release
  ## 添加软件源的gpg密钥
  curl -fsSL https://mirrors.aliyun.com/docker-ce/linux/ubuntu/gpg | sudo gpg --dearmor -o /usr/share/keyrings/docker-archive-keyring.gpg

   ## 然后,我们需要向 sources.list 中添加 Docker 软件源
   echo \
  "deb [arch=amd64 signed-by=/usr/share/keyrings/docker-archive-keyring.gpg] https://mirrors.aliyun.com/docker-ce/linux/ubuntu \
  $(lsb_release -cs) stable" | sudo tee /etc/apt/sources.list.d/docker.list > /dev/null
  ## 安装docker
   sudo apt-get update
   sudo apt-get install docker-ce docker-ce-cli containerd.io docker-compose
   ## docker-compose文件路径
   sudo chmod +x /usr/local/bin/docker-compose
   ## 添加用户组
   sudo groupadd docker
   sudo usermod -aG docker $USER
   logout
安装对应的docker容器
###nginx
docker run -itd --name nginx -e TZ="Asia/Shanghai" -p 80:80 --restart=always nginx
### dozzle
docker run --detach --volume=/var/run/docker.sock:/var/run/docker.sock -p 8080:8080 --restart=always amir20/dozzle
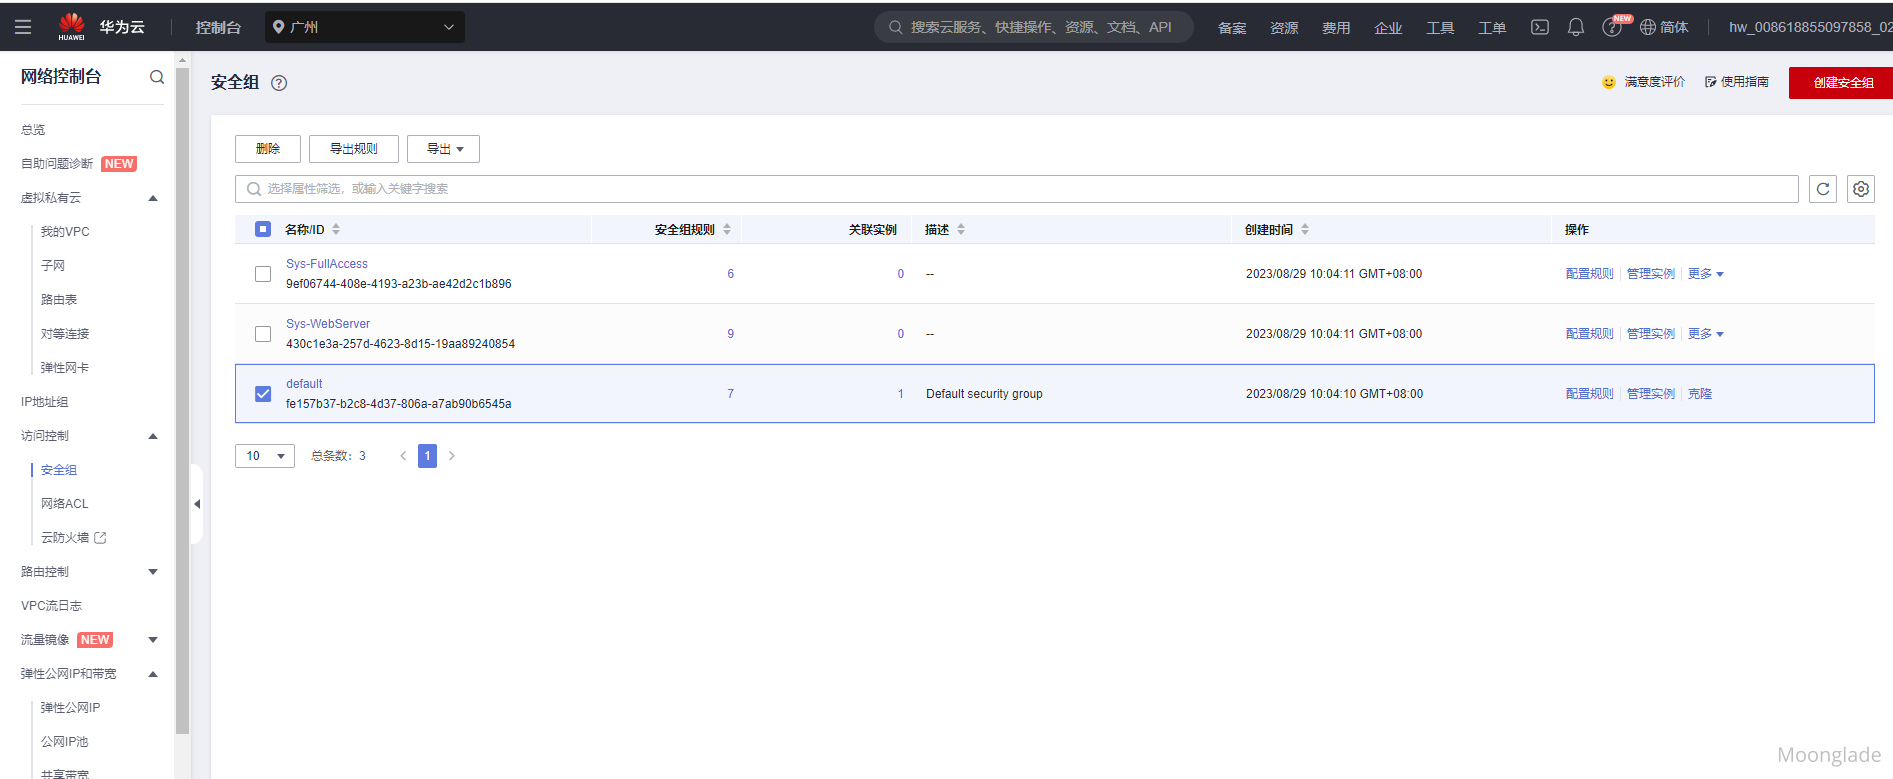
在华为云配置对外出口规则
FRP
服务端配置
## 上传frp文件,其中,/path/to/local/file是本地文件的路径,username是远程服务器的用户名,remote是远程服务器的IP地址或主机名,/path/to/remote/directory是远程服务器上文件存储的目录路径。
scp /path/to/local/file username@remote:/path/to/remote/directory
## 配置systemd
sudo vim /etc/systemd/system/frpc.service
## 修改配置文件

[Unit]
# 服务名称,可自定义
Description = frp server
After = network.target syslog.target
Wants = network.target

[Service]
Type = simple
# 启动frps的命令,需修改为您的frps的安装路径
ExecStart = /home/eproot/frp/frpc -c /home/eproot/frp/frpc.toml

[Install]
WantedBy = multi-user.target

## 启动服务
# 启动frp
sudo systemctl start frpc
# 停止frp
sudo systemctl stop frps
# 重启frp
sudo systemctl restart frps
# 查看frp状态
sudo systemctl status frpc
# 开机自启动
sudo systemctl enable frpc
使用 NSSM(Non-Sucking Service Manager)将 Windows exe 文件作为服务启动。NSSM是一个免费的开源工具,可以将任何标准的Windows可执行文件转换为 Windows 服务。具体操作步骤如下:
下载 NSSM 工具,可以从官网(https://nssm.cc/download)下载最新版本。
解压 NSSM 工具,将 nssm.exe 文件放到 exe 文件所在目录。
打开命令提示符,使用管理员权限运行。
进入 exe 文件所在的目录,输入以下命令创建服务:
nssm install ServiceName "C:\path\to\exe\file.exe"其中 ServiceName 为服务的名称,"C:\path\to\exe\file.exe" 为 exe 文件的路径。
完成后会弹出 NSSM 的配置窗口,可以在其中设置服务的启动参数、工作目录等。
点击“Install Service”按钮,服务就会被安装并启动。
NSSM 还支持服务的启动、停止、重启等操作,可以使用以下命令:
nssm start ServiceName
nssm stop ServiceName
nssm restart ServiceName
映射对应的容器日志
dozzle
ci/cd流水线
gitlabrunner
文章整体结构清晰,内容详实,为读者提供了一套较为完整的华为云主机初始化配置指南。从用户管理到容器服务部署,覆盖了云主机使用的核心场景,体现了作者对云环境配置流程的系统化整理能力。以下从多个维度进行具体分析:
优点分析
模块化拆解优势
通过任务清单([x]标记)与代码块分段展示,将复杂的配置流程拆解为可执行的独立模块。例如Docker安装章节中,从基础依赖准备到用户组配置的逻辑链条清晰,便于读者逐步验证执行。
实践性导向突出
提供了如
zsh-autosuggestions插件集成、FRP穿透服务配置等具体功能实现方案,尤其在容器部署部分,docker-compose权限配置与服务自启动设置的代码示例具有直接复用价值。风险预防意识
在SSH免密配置部分,明确提示权限检查要点(
/home/gxhao/.ssh/目录权限),并附带常见错误排查链接,显示出对典型配置陷阱的预见性。改进空间建议
跨平台工具兼容性说明
FRP章节提到的NSSM工具专用于Windows服务管理,但文中未明确区分Linux/Windows配置差异。建议补充Linux环境下使用systemd管理FRP服务的完整配置示例,避免读者混淆。
权限配置细节深化
.ssh/authorized_keys权限设置是SSH免密登录的关键,但文中仅提及检查权限,未给出具体修正命令。可补充如chmod 600 ~/.ssh/authorized_keys等关键指令,增强可操作性。流程衔接优化
Docker用户组配置后需重新登录生效的提示(
logout)出现在安装步骤末尾,建议将其前置到用户组创建后,避免读者因遗漏该步骤导致权限问题。安全最佳实践补充
防火墙部分提到的
nc端口转发存在潜在安全风险,建议补充说明其仅适用于临时测试场景,并推荐使用更安全的SSH端口转发方式替代。延伸拓展建议
环境变量管理
可补充
.bashrc/.zshrc中环境变量配置的最佳实践,如区分开发/生产环境的变量管理策略。自动化脚本封装
对于高频使用的配置命令(如用户创建、Docker安装),建议提供可复用的bash脚本模板,提升批量部署效率。
备份策略集成
增加对关键配置文件(如
/etc/ssh/sshd_config、/etc/docker/daemon.json)的备份方案,例如使用rsync定期同步到对象存储。日志监控体系
在Dozzle容器监控基础上,可扩展介绍Prometheus+Grafana的云主机监控方案,构建更完整的运维体系。
技术准确性验证
curl -fsSL https://get.docker.com | bash安装脚本,当前采用apt-get方式虽可行,但与标准实践存在差异,建议补充说明选择apt源的原因。ExecStart路径使用/home/eproot/frp/frpc,但未说明该路径需提前创建,建议补充文件上传与目录结构准备步骤。总体而言,本文档已具备较强实用价值,通过上述细节优化可进一步提升专业度与可维护性。期待后续能看到关于云主机资源监控、安全加固等进阶内容的补充。
这篇文章涵盖了Docker容器化部署、FRP配置、CI/CD流水线搭建以及NSSM工具使用等多个方面,内容非常丰富。作者通过实际操作记录了自己的技术实践,体现了较强的动手能力和学习能力。
对于文中提到的Docker容器化部署部分,特别是Nginx和Dozzle容器的安装配置,我感到很有趣。Nginx作为常见的Web服务器,广泛应用于生产环境,而Dozzle作为一个可视化工具,能够直观展示Docker容器的状态,这对开发者来说非常有帮助。不过,在实际应用中,这些容器的资源限制和性能优化可能需要更多的关注。作者有没有遇到过容器资源分配不足或过高占用的情况?是如何解决的?
FRP配置部分展示了作者在内网穿透方面的实践。通过Systemd管理FRP服务,确保了服务的稳定运行。然而,FRP的安全性和可靠性也是一个值得探讨的话题。比如,如何保障通信的安全性,防止被中间人攻击?有没有设置相应的认证机制或使用加密传输?
关于NSSM工具的使用,这是Windows环境下一个非常实用的技巧。通过 NSSM 将可执行文件注册为系统服务,可以提高应用程序的稳定性和可用性。不过,在实际部署中,可能会遇到兼容性问题或者服务依赖管理的复杂性。作者有没有碰到过类似的问题?有没有其他类似的工具或方法可以实现类似的功能?
文中还提到了CI/CD流水线搭建和GitLab Runner的使用。这是DevOps领域的重要组成部分,能够显著提升开发效率和代码质量。不过,在实际应用中,流水线的配置和维护可能需要较高的技术门槛。作者有没有分享过自己的流水线配置文件?在自动化测试、构建和部署过程中,有没有遇到特别有挑战性的问题?
最后,关于映射容器日志部分,使用Dozzle可视化日志是一个很好的选择。不过,对于更复杂的监控需求,是否考虑集成其他工具如Prometheus或Grafana?这些工具能够提供更全面的监控和报警功能。
总之,这篇文章展现了作者在技术实践中的探索精神和解决问题的能力。如果能进一步分享更多实战经验、遇到的问题及解决方案,将会为读者带来更大的启发。
这篇博客提供了购买华为云主机的一些初始化操作,包括配置用户、ssh、zsh、docker、外网出口等,同时给出了一些相关链接以供参考。其中,文章的优点在于提供了详细的命令操作,使得读者可以快速地进行配置操作。此外,作者还提供了一些相关链接以供参考,方便读者进一步了解相关知识。文章的核心理念在于为读者提供一个快速、安全、便捷的云主机环境,同时也提供了一些相关的知识和技巧,以便读者更好地使用和管理云主机。
然而,这篇博客也存在一些可以改进的地方。首先,在文章中没有明确说明华为云主机的优势和特点,也没有提供其他云主机供读者进行比较和选择。其次,在部分操作中,没有给出详细的解释和原理,可能会导致读者对操作的理解不够深入。此外,在操作中也没有提供错误处理和排查的方法,可能会给读者带来一些困扰。
总的来说,这篇博客提供了一些实用的操作命令和相关知识,对于需要购买和使用华为云主机的读者来说是一篇不错的参考资料。但是,还有一些可以改进的地方,比如完善文章的逻辑和结构,提供更多的实例和案例,以及增加一些错误处理和排查的方法等。